SpringBoot Application注解原理及代碼詳解
1、SpringBoot 啟動main()
@SpringBootApplicationpublic class TomcatdebugApplication { public static void main(String[] args) { SpringApplication.run(TomcatdebugApplication.class, args); }}
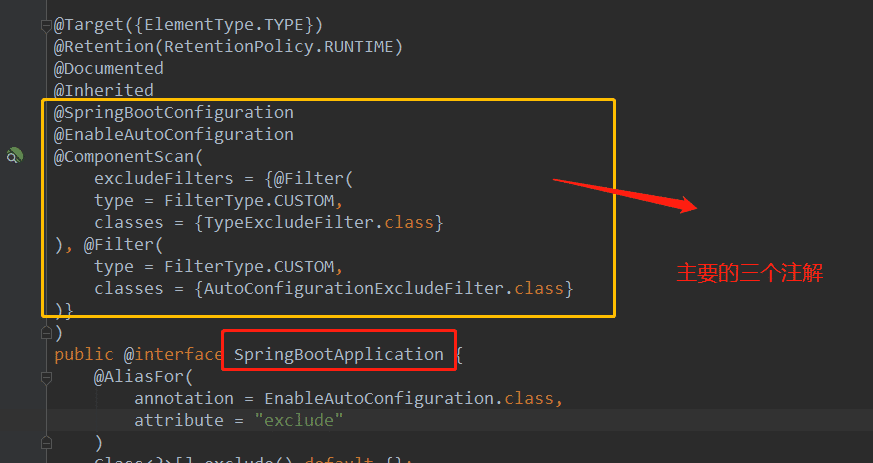
1.1 @SpringBootApplication 注解,其實主要是@ComponentScan,@EnableAutoConfiguration,@SpringBootConfiguration三個注解
@ComponentScan 注解:
spring里有四大注解:@Service,@Repository,@Component,@Controller用來定義一個bean.@ComponentScan注解就是用來自動掃描被這些注解標識的類,最終生成ioc容器里的bean.
可以通過設置@ComponentScan basePackages,includeFilters,excludeFilters屬性來動態確定自動掃描范圍,類型已經不掃描的類型.
默認情況下:它掃描所有類型,并且掃描范圍是@ComponentScan注解所在配置類包及子包的類
@SpringBootConfiguration 注解:
@SpringBootConfiguration繼承自@Configuration,二者功能也一致,標注當前類是配置類,并會將當前類內聲明的一個或多個以@Bean注解標記的方法的實例納入到spring容器中,并且實例名就是方法名。
demo 說明:
(1) 注入spring ioc bean
@SpringBootConfigurationpublic class Config { @Bean public Map createMap(){ Map map = new HashMap(); map.put('username','gxz'); map.put('age',27); return map; }}
(2)調用:
public static void main( String[] args ) { //方式1 獲取context ConfigurableApplicationContext context = SpringApplication.run(App.class, args); context.getBean(Runnable.class).run(); context.getBean('createMap'); //注意這里直接獲取到這個方法bean int age = (int) map.get('age'); System.out.println('age=='+age);//方式2. 使用@Autowired注解,應用bean // @Autowired// Map createMap}
@EnableAutoConfiguration 注解
@EnableAutoConfiguration作用:從classpath中搜索所有的META-INF/spring.factories配置文件,然后將其中key為org.springframework.boot.autoconfigure.EnableAutoConfiguration的value加載到spring容器中。
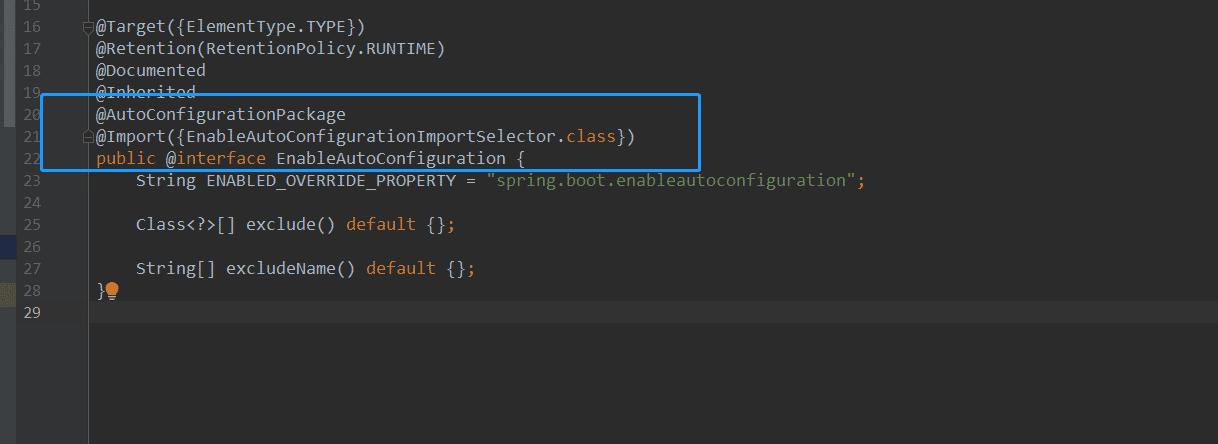
上圖分析源碼可知: @EnableAutoConfiguration = @Import + @AutoConfigurationPackage
@AutoConfigurationPackage:主要作用是自動配置包
@Import: Spring底層注解@Import,給容器中導入一個組件;導入的組件由AutoConfigurationPackages.Registrar.class將主配置類(@SpringBootApplication標注的類)的所在包以及下面所有子包里面的所有組件掃描到Spring容器。
AutoConfigurationImportSelector的作用是導入哪些組件的選擇器。將所有需要導入的組件以全類名的方式返回,這些組件就會被添加到容器中;也會給容器導入非常多的自動配置類(xxxAutoConfiguration),就是給容器中導入這個場景需要的所有組件,并配置好這些組件。
有了自動配置類,免去了我們手動編寫配置注入功能組件等的工作
具體工作流程圖:
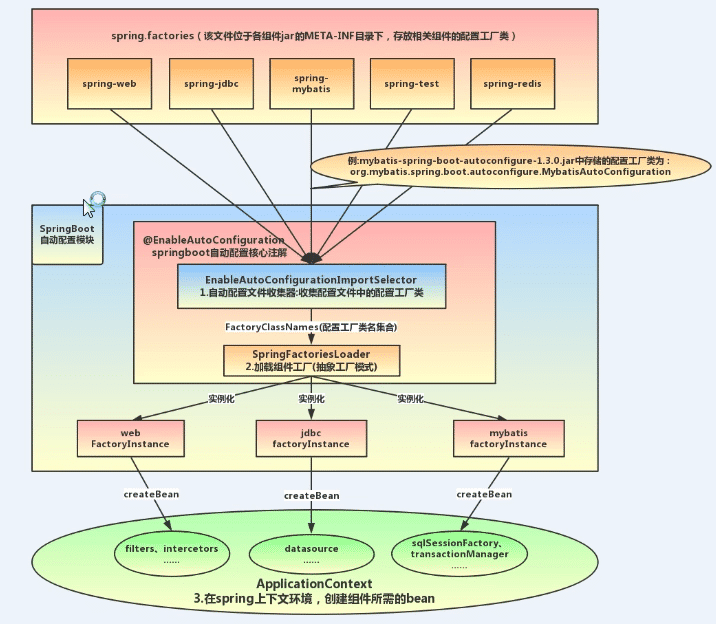
@EnableAutoConfiguration加載過程
自動配置主要由AutoConfigurationImportSelector實現的,我們主要從這個類開始講起。AutoConfigurationImportSelector是@EnableAutoConfiguration“@Import”的DeferredImportSelector實現類,由于DeferredImportSelector作為ImportSelector的子接口,所以組件自動配置邏輯均在selectImports(AnnotationMetadata)方法中實現
源碼分析:
AutoConfigurationImportSelector.java
根據以上代碼分析自動配置加載過程主要分為以下幾個步驟:
1.判斷是否開啟自動配置
2.從META-INF/spring-autoconfigure-metadata.properties文件中載入屬性配置
3.獲取所有的配置列表
public String[] selectImports(AnnotationMetadata annotationMetadata) { //1.是否開啟自動配置,默認開啟 if (!this.isEnabled(annotationMetadata)) { return NO_IMPORTS; } else { try { //2.從META-INF/spring-autoconfigure-metadata.properties文件中載入屬性配置(有一些有默認值),獲取注解信息 AutoConfigurationMetadata autoConfigurationMetadata = AutoConfigurationMetadataLoader.loadMetadata(this.beanClassLoader);//3.獲取所有的配置列表 AnnotationAttributes attributes = this.getAttributes(annotationMetadata); List<String> configurations = this.getCandidateConfigurations(annotationMetadata, attributes); configurations = this.removeDuplicates(configurations); configurations = this.sort(configurations, autoConfigurationMetadata); Set<String> exclusions = this.getExclusions(annotationMetadata, attributes); this.checkExcludedClasses(configurations, exclusions); configurations.removeAll(exclusions); configurations = this.filter(configurations, autoConfigurationMetadata); this.fireAutoConfigurationImportEvents(configurations, exclusions); return (String[])configurations.toArray(new String[configurations.size()]); } catch (IOException var6) { throw new IllegalStateException(var6); } }}
1.是否開啟自動配置,默認開啟
protected boolean isEnabled(AnnotationMetadata metadata) { return true; }
2.從META-INF/spring-autoconfigure-metadata.properties文件中載入屬性配置
protected static final String PATH = 'META-INF/spring-autoconfigure-metadata.properties'; private AutoConfigurationMetadataLoader() { } public static AutoConfigurationMetadata loadMetadata(ClassLoader classLoader) { return loadMetadata(classLoader, 'META-INF/spring-autoconfigure-metadata.properties'); } static AutoConfigurationMetadata loadMetadata(ClassLoader classLoader, String path) { try { Enumeration<URL> urls = classLoader != null ? classLoader.getResources(path) : ClassLoader.getSystemResources(path); Properties properties = new Properties(); while(urls.hasMoreElements()) {properties.putAll(PropertiesLoaderUtils.loadProperties(new UrlResource((URL)urls.nextElement()))); } return loadMetadata(properties); } catch (IOException var4) { throw new IllegalArgumentException('Unable to load @ConditionalOnClass location [' + path + ']', var4); } }
3、獲取所有的配置列表
protected AnnotationAttributes getAttributes(AnnotationMetadata metadata) { String name = this.getAnnotationClass().getName(); AnnotationAttributes attributes = AnnotationAttributes.fromMap(metadata.getAnnotationAttributes(name, true)); Assert.notNull(attributes, 'No auto-configuration attributes found. Is ' + metadata.getClassName() + ' annotated with ' + ClassUtils.getShortName(name) + '?'); return attributes; }
總結:
springboot底層實現自動配置的步驟:
1.springboot應用啟動
2.@SpringBootApplication起作用
3.@EnableAutoConfiguration
4.@AutoConfigurationPackage:這個組合注解主要是@Import(AutoConfigurationPackages.Registrar.class),它通過將Registrar類導入到容器中,而Registrar類作用是掃描主配置類同級目錄以及子包,并將相應的組件導入到springboot創建管理的容器中
5.@Import(AutoConfigurationImportSelector.class):它通過將AutoConfigurationImportSelector類導入到容器中,AutoConfigurationImportSelector類作用是通過selectImports方法實現將配置類信息交給SpringFactory加載器進行一系列的容器創建過程,具體實現可查看上面的源碼
以上就是本文的全部內容,希望對大家的學習有所幫助,也希望大家多多支持好吧啦網。
相關文章:

 網公網安備
網公網安備