手把手教你SpringBoot快速集成Swagger的配置過(guò)程
相信大家無(wú)論是做前端還是做后端的,都被接口接口文檔所折磨過(guò),前端抱怨接口文檔和后端給的不一致,后端抱怨寫(xiě)接口文檔很麻煩,所以Swagger就誕生了。直接配置即可自動(dòng)生成接口文檔,而且提供了高效的API測(cè)試話不多說(shuō)直接開(kāi)干導(dǎo)入SpringBoot集成Swagger所需要的依賴(lài)
<!--web方便測(cè)試--> <dependency> <groupId>org.springframework.boot</groupId> <artifactId>spring-boot-starter-web</artifactId> </dependency> <!-- swagger2核心包 --> <dependency> <groupId>io.springfox</groupId> <artifactId>springfox-swagger2</artifactId> <version>2.9.2</version> </dependency> <!-- swagger-ui 可視化界面 --> <dependency> <groupId>io.springfox</groupId> <artifactId>springfox-swagger-ui</artifactId> <version>2.9.2</version> </dependency>
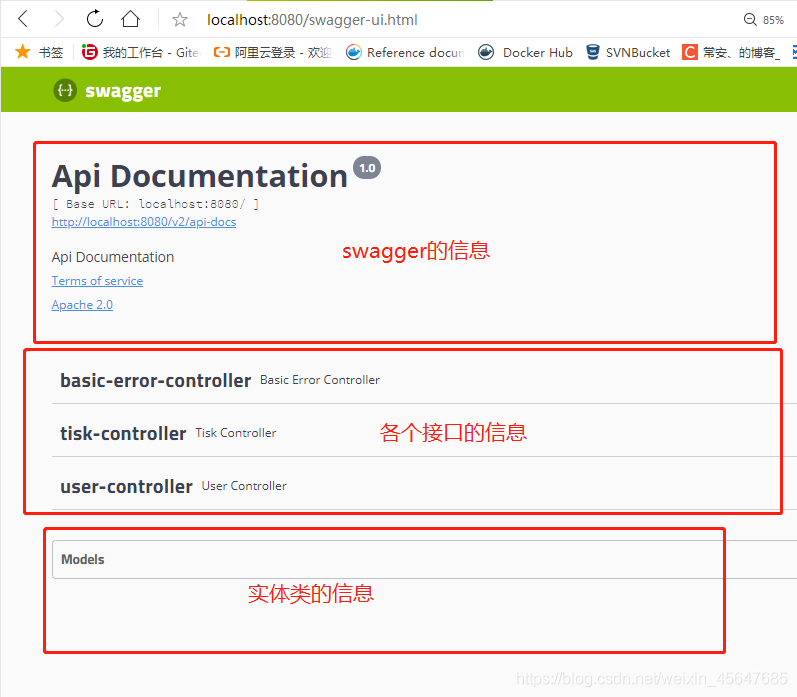
Swagger可視化界面可分為三個(gè)區(qū)域
Swagger相關(guān)配置
package com.example.config;import org.springframework.context.annotation.Bean;import org.springframework.context.annotation.Configuration;import springfox.documentation.builders.RequestHandlerSelectors;import springfox.documentation.service.ApiInfo;import springfox.documentation.service.Contact;import springfox.documentation.spi.DocumentationType;import springfox.documentation.spring.web.plugins.Docket;import springfox.documentation.swagger2.annotations.EnableSwagger2;import java.util.ArrayList;@Configuration@EnableSwagger2 //開(kāi)啟Swagger的使用public class SwaggerConfig { @Bean //Swagger的使用主要是要將docket對(duì)象傳入IOC容器 public Docket docket(){ return new Docket(DocumentationType.SWAGGER_2).apiInfo(apiInfo()) //關(guān)于文檔的各種信息.enable(true) //使Swagger生效.groupName('常安祖').select()//選擇掃描的接口.apis(RequestHandlerSelectors.basePackage('com.example.controller'))//指定掃描的接口.build(); } public ApiInfo apiInfo(){ Contact contact = new Contact('長(zhǎng)安','https://blog.csdn.net/weixin_45647685','719801748@qq.com');//個(gè)人的聯(lián)系方式 return new ApiInfo('長(zhǎng)安的文檔', '長(zhǎng)安的開(kāi)發(fā)文檔', '1.0', 'urn:tos',null, 'Apache 2.0', 'http://www.apache.org/licenses/LICENSE-2.0', new ArrayList());//文檔的各種信息 }}
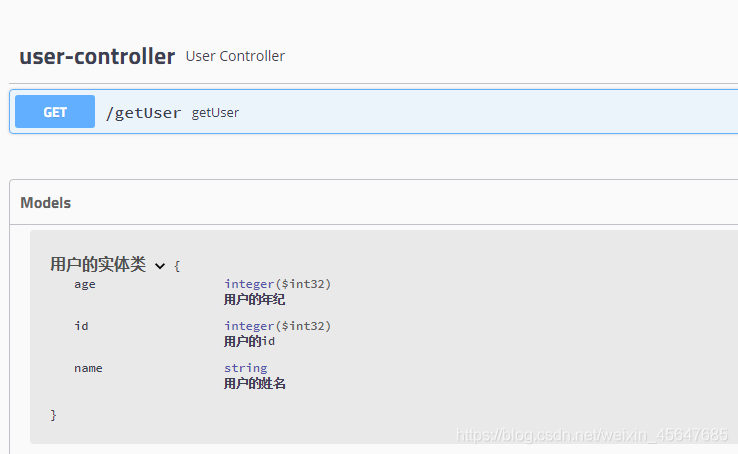
@ApiModel( ) //主要用來(lái)標(biāo)注返回的實(shí)體類(lèi)@ApiModelProperty( ) //主要用來(lái)標(biāo)注實(shí)體類(lèi)中的屬性案例:
@ApiModel('用戶的實(shí)體類(lèi)')public class User implements Serializable { @ApiModelProperty('用戶的id') private Integer id; @ApiModelProperty('用戶的姓名') private String name; @ApiModelProperty('用戶的年紀(jì)') private Integer age; public Integer getId() { return id; } public User(Integer id, String name, Integer age) { this.id = id; this.name = name; this.age = age; } public void setId(Integer id) { this.id = id; } public String getName() { return name; } public void setName(String name) { this.name = name; } public Integer getAge() { return age; } public void setAge(Integer age) { this.age = age; }}
@ApiModelProperty用來(lái)標(biāo)注API接口案例:
package com.yangzihao.controller;import com.yangzihao.entity.User;import io.swagger.annotations.ApiModelProperty;import org.springframework.stereotype.Controller;import org.springframework.web.bind.annotation.GetMapping;import org.springframework.web.bind.annotation.RequestMapping;@RestControllerpublic class UserController { @ApiModelProperty('得到一個(gè)User') @GetMapping('/getUser') public User getUser(){ return new User(1,'測(cè)試',18); }}
進(jìn)入Swagger可視化界面

使用Swagger進(jìn)行接口測(cè)試
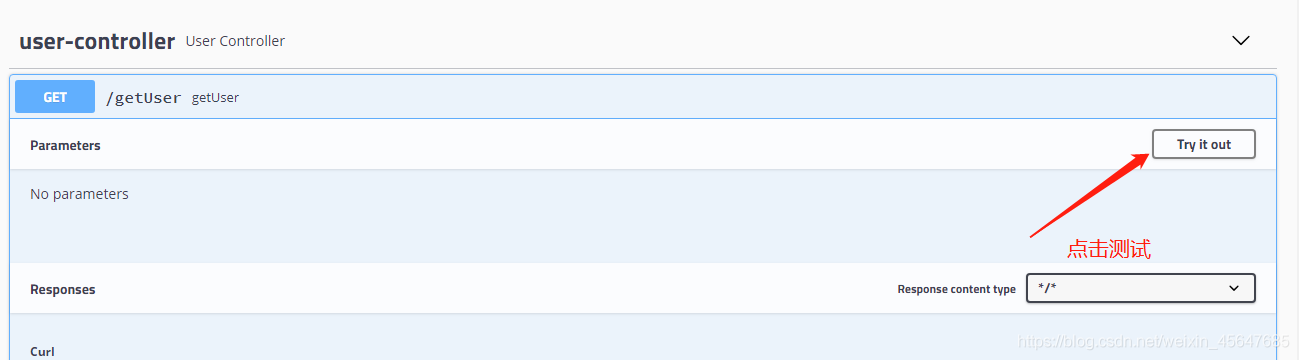
執(zhí)行
到此這篇關(guān)于手把手教你SpringBoot快速集成Swagger的配置過(guò)程的文章就介紹到這了,更多相關(guān)SpringBoot集成Swagger內(nèi)容請(qǐng)搜索好吧啦網(wǎng)以前的文章或繼續(xù)瀏覽下面的相關(guān)文章希望大家以后多多支持好吧啦網(wǎng)!
相關(guān)文章:
1. JAMon(Java Application Monitor)備忘記2. js的一些潛在規(guī)則使用分析3. 如何用 Python 制作一個(gè)迷宮游戲4. 讓chatgpt將html中的圖片轉(zhuǎn)為base64方法示例5. IntelliJ IDEA設(shè)置默認(rèn)瀏覽器的方法6. Python PyQt5中彈出子窗口解決子窗口一閃而過(guò)的問(wèn)題7. NetCore 配置Swagger的詳細(xì)代碼8. Python基于pyjnius庫(kù)實(shí)現(xiàn)訪問(wèn)java類(lèi)9. python怎樣讀取txt文件的數(shù)據(jù)內(nèi)容10. python檢查目錄文件權(quán)限并修改目錄文件權(quán)限的操作
 網(wǎng)公網(wǎng)安備